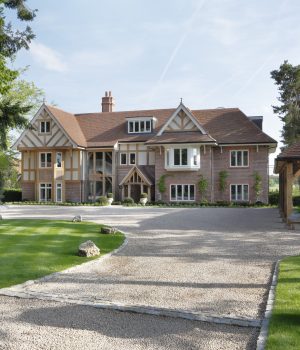
Cladding a Brick house in Oak is fantastic for both aesthetic and function.
From planning to install, we’re here to point you in the right direction.
Benefits of Oak Cladding
1. Appearance
Oak is famous for its distinct look. The addition of Oak Cladding to a modern new build creates a traditional sense of character.
This is especially true of Air Dried or Kiln Dried Oak with its pre – aged appearance.
Oak Cladding comes in a variety of styles to suit your ideas. These can either be either machined with clean, sharp edges or moulded with decorative touches.
A modern, utilitarian look can be achieved with cleanly interlocking Tongue and Groove Cladding. If preferred, a more traditional style of overlapping Shiplap or Feather Edge can be used.
2. Low Environmental Impact
As a natural resource, Oak is a carbon neutral building material.
Carbon absorbed during the life of the tree is retained within the wood on felling and no potentially polluting manufacturing processes are needed.
Oak needs no chemical treatment to be ready for outdoor use and no ongoing treatment after installation.
Installation itself is simple and uses no processes causing harmful emissions or polluting waste. If the cladding is eventually removed, the timber can be recycled for other purposes.
3. Durability
Oak is famed for its resistance to weather damage, damp and insect and fungal attack. As a result, it should never need to be replaced. Under normal conditions, it requires no maintenance, even outside.
Although oak is sometimes seen as an expensive, premium construction material, over time it can be more cost effective than softwoods due this durability.
4. Insulating Properties
Adding a layer external cladding to exterior walls automatically improves both thermal and sound insulation. While extra insulating material can be fitted between the wall and cladding, this can be omitted. The layer of trapped air between the two will improve insulation and paired with oak this improves still further.
This will not only trap heat inside the building during winter, keeping it warmer. It will also keep it cool during summer as it impedes the movement of heat across the gap. Oak also naturally insulates against sound.
5. Planning Permission
As the building footprint is not be extended by cladding, planning permission most likely not be necessary.
All types of house cladding fall within the parameters of Permitted Development apart from buildings on protected land. This includes areas of outstanding natural beauty, national parks, world heritage sites and conservation areas.
However, if you’re in doubt it is better to check with the local Development Management Team.
If the building is attached to another, for example a semi detached or terraced house, it is worth considering if this will affect your neighbours. If they choose to lodge a formal complaint, it could result in legal action, lost money and ill will between households.
6. Installation
Cladding a brick house in Oak is straightforward and well within the abilities of most DIY enthusiasts. This saves time and money compared to sourcing and employing professionals to do it for you.

Cladding a Brick House – Installation
The following is a brief overview of the processes involved in installing Oak Cladding. It is by no means exhaustive and if you do decide to install your own cladding it is worth taking further advice.
1. Plan Ahead Properly
Once the decision to opt for Oak Cladding is made, it is time to work on the details. Firstly, decide on the cladding profile.
Do you prefer the look of a simple Tongue and Groove, an overlapping Shiplap or Feather Edge, or Waney Edge? If you prefer a more individual moulding for the profile, get in touch to discuss any difficulties or increases in cost this may cause.
Vertical cladding boards require more work to install and this should be assessed at this point, too.
2. Project Management
Double check all measurements to make sure you have sufficient timber of the correct lengths before starting.
Organise a storage space for the timber during installation, covered, out of direct sunlight, off the ground and well ventilated. Create a detailed management plan for the timescale of the build and individual roles if others are assisting.
If Fresh Sawn oak (Green Oak) is being used it is vital that is installed within a few days of delivery to avoid shrinkage issues.
3. Fix Battens and Membrane
Battens will need to be attached to the brick wall and the cladding boards are nailed to these, leaving a gap between the wall and boards.
For timber framed houses, the wall should be fitted with a breather membrane to prevent moisture penetration. For a brick building with cavity walls this is not necessary.
The battens should be made from a durable timber such as pressure treated softwood for BSEN355:1 use Class 3 applications.
They should be at least 21mm thick to allow a sufficiently wide gap for ventilation between the brick wall and cladding. These can be nailed, shot fired or screwed and plugged to the wall vertically.
They are normally fitted 600mm apart but for Green Oak 400mm is recommended due to its higher moisture content.
For vertical cladding, a second layer of battens are fixed to these at 600mm intervals. These should also have a 15mm machined edge on top to allow water to be shed into the cavity.
4. Fix Cladding
When fixing Oak boards to the underlying battens, stainless steel nails should be used.
This will prevent the tannins in the Oak reacting with the metal, causing staining and discolouration and corroding the nails. Air dried cladding should be fixed to the battens with two nails spaced towards the edges of the board.
Overlapping Green Oak boards should be fixed at the bottom of the wall with the thicker ‘heart’ facing away from the building. The next board is then laid over this, and one nail hammered through 10mm above the edge of the underlying board.
This is then repeated with each subsequent board, using one nail for each fixing to allow for shrinkage as the Green Oak dries.
At Hardwoods Group, we manufacture all of our Oak Cladding lines onsite so we can guarantee perfect quality every time.
Please contact us if you have any questions!